May 25, 2011

Celebrate Women Party- Part 2

Yesterday I showed you the dessert and pamper table to the vintage women celebration party I planned for repeat client Iris. Today I am excited to show you the other details. I knew I wanted to created a focal point to the party and I did that with the gigantic mesh canopy that I hung over the cheese and wine table.


In the center of the netting I hung a light weight chandelier with crystals and flowers;


I put more girl sayings coming out of lemons. Everywhere the ladies looked there were personal touches that they loved!


I love these vintage looking candlesticks!


One of my signature party touches is adding a strawberry to the rim of a wine glass. Everyone loves having a strawberry in their bubbly! The sign read, "When I read about the evils of drinking, I stopped reading" hehehe


Erika and I became friends when I planned her 2009 wedding! We have remained friends and she has joined our team and is a power-house wine opener!


I wanted the non-drinkers to have their own special table, so using this vintage stick backdrop, I created a water and ice tea table. Hubbylicious suggested I open the drawer and put the lemons inside the drawer! Sometimes, ladies, our men are genius!


I love the mason jars with yellow straws!


The yellow uplight did wonders for this table!


The pool was another main focal point, so I was estatic when my floating bardge actually....float!


I found this awesome transparent lace paper at Michaels and wrapped some of the jars. It gave plain jars a very vintage feeling!


A special thank you to my dear client Iris for choosing Circle The Date Events, LLC as her event planner again! To my friendor (part friend/part vendor/part super hero) Kim Garcia for the gorgeous pictures!

If you would like a fabulous event like this, please send me an email at CircleTheDate@hotmail.com. I offer a complimentary consulation so we can discuss your event in depth.


Until Next Time...Happy Planning


May 24, 2011

Celebrate Women Party

One of the nicest compliments I receive are when my clients cry when they see a table or party I plan for them and when I have repeat clients. Recently I had the honor of planning a woman celebration party for my repeat client Iris. She invited 25 of her best friends who inspire her everyday to be a better person and invited them to invite their best friend. The party ended up being 50 of the most amazing women I have met to date!

When we were planning the party, Iris asked for a cheese, wine table and a dessert table. She asked that the party be very girly and soft using yellows, and greys. Today I am going to show you the dessert and pamper table;

I had an idea to rent grey linens and top them with ivory lace tablecloth. This wasn't your mamas lace tablecloth this tablecloth had an antique vintage look to it which was a perfect backdrop to add a rustic gate with hanging crystals and candles. One of my favorite touches to my events is uplighting. It completely changes the way a table looks. Notice how I shined the yellow light up the wall behind the table! I ordered 150 assorted flavored cake pops from my amazing cake pop vendor and needless to say they were gobbled up. I kept 50 aside and had them wrapped in clear paper and sent them home with the ladies as favors.


To personalize each table I brought in sayings that the ladies really enjoyed reading, like this one that said "friends are like bras; close to your heart and there for support  :)


I have had this idea for awhile to bring furniture into a party space and create an indoor feeling outdoors. When we were in Julian, California for my birthday I found this antique dressing table that looked terrible but I bought it anyway for $10 bucks. I removed the old brown paint fixed the stool and painted it a soft yellow. I used it to create a pamper station for the ladies. Bath & Body Works lotions, anti bacterial gel, lip gloss, nail polish, nail files and a little manicure set created the cutest pamper station I have seen (if I say so myself!)


Keeping the rustic vintage look I brought in a milk jug with fresh flowers, a small mannequin and a clock under a glass. I wrote "Pamper Yourselves Love Iris" in bright red lipstick on the mirror!


Needless to say, the ladies LOVED the station!


It might be kinda hard to tell from this picture but I openend the bottom drawer and filled it with more yellow flowers which really popped off the soft yellow dressing table;


I can't wait to bring you more fabulous pictures tomorrow of the dessert table and other party details. This amazing event was captured by Kim Garcia Photography. You have heard me say it before but this lady is amazing! If you would like a fabulous event like this, please send me an email at CircleTheDate@hotmail.com

Until Next Time...Happy Planning!

May 11, 2011

Summer Party Signature Drink: Watermelon Sidecar

I am planning an anniversary party this summer and was wanting to give my wonderful client a signature drink. I was so excited when I found this recipe on Sunset magazine for the watermelon sidecar. Nothing, to me, says summer without smacking you across the head with a summer themed party than watermelon.


One of the awesome parts about my job is that I get to make and sample this drink...for research ofcourse! Here is the recipe;


Whirl chunks of watermelon in a food processor until blended, then strain. Rub the rim of a martini glass with a cut lemon wedge, then dip rim in a shallow plate of sugar. Pour 3 tbsp. watermelon juice, 2 tbsp. brandy, 1 tbsp. lemon juice, and 2 tbsp. Cointreau into a cocktail shaker filled with ice. Shake thoroughly, then strain into glass. Garnish with watermelon wedges. YUM, right?!


I hope this drink recipe will encourage you to throw a summer party for your loved ones. Invite us to come throw it for you so you can stay where you belong...with your guests and stress free!

Until Next Time...Happy Planning!

May 10, 2011

Spring Trend Alert: Artichokes

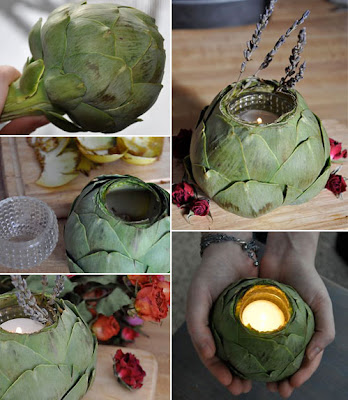
I am the on site coordinator for From The Farm, which is a rustic venue located off highway 95. Right now you can glean as many artichokes from their field, that can fit in their compliementary bag for one price. I have always been a huge fan of spinach & artichoke dip and using artichokes for table displays. Look at these amazing pictures I found using artichokes as centerpieces;


Am I the only one who didn't know they came in purple? I love this shade playing off the yellow glass;


I love this idea of using an artichoke as a name place setting;


Ok! This idea I HAVE to try! This is sooo cute!


When you couple the artichoke with flowers its stunning!


I hope this inspires you to think outside the box for your next spring table display. Visit http://www.fromthefarmyuma.com/ to find hours of operation.

Until Next Time...Happy Planning!


Pictures from BV Weddings, Wedding Bee, The Knot and The Party Dress

May 6, 2011

Fabulous Friday Find: Cupcake Liner Pomander Ball


Happy Friday! As you know every Friday I bring you something I found that you just have to see!


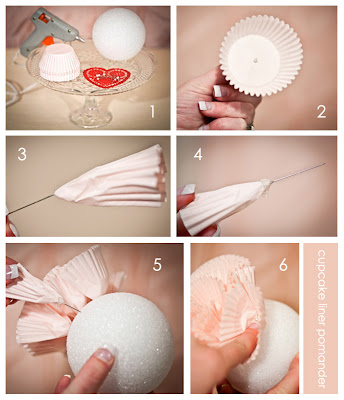
When I saw this sweet pomander centerpiece (made completely out of cupcake liners!) over on Kara’s Party Ideas, I knew I had to show it to you! It’s the perfect centerpiece for a Valentine’s Day party, or for a kid’s birthday party! In fact, I am TOTALLY going to give this a try for one of my upcoming parties! Kara was nice enough to provide step-by-step instructions on how to make these, check out these pictures;


Here are the step-by-step instructions from Kara:
 
Gather your materials: Cupcake liners {any color or style}, a styrofoam ball, a glue gun, and pins


Take 2 cupcake liners and stick a pin through the center of them…

Fold/scrunch the 2 liners around the pin like so…

Put a dab of hot glue on the tip of the liners…

Insert the pin into the styrofoam ball…Push the pin all the way into the styrofoam so the cupcake liners are securely glued to the ball…Carefully open the liners making sure the pin is all the way inserted into the styrofoam. If it isn’t, push it all the way in….

Repeat until the whole ball is covered with lovely cupcake liners! Attach fishing line or a ribbon to hang! {For this particular pom pom I left a space uncovered so I could set the ball on a large glass candlestick}…

Thanks Kara for this great idea!! I hope you have a great weekend!

Until Next Time...Happy Planning


May 5, 2011

Neat Food Idea: Panini Pops

Happy Cinco de mayo and Happy 15 month birthday to Maddycakes! I could give you a ton of Mexican holiday inspirational party pics but you can go to any other blog and see that. So today I bring you the dish I am best at...grilled cheese! HA!! Perfect for your next playdate, or kid’s birthday party, Panini Happy came up with this adorable idea! These are basically mini grilled cheese sandwiches on a stick, so you can choose whatever bread and cheese you like. It’s probably best to stick with the semi-firm cheeses, as soft cheeses may melt too much to hold the lollipop sticks in place.


INGREDIENTS

Sliced country-style bread (relatively dense is best, I used sourdough)
Cheese (semi-firm, such as cheddar)
Finely crumbled or minced add-ins (e.g., bacon, herbs, peppers, olives)
Lollipop sticks (Wilton’s)
Cookie cutters

DIRECTIONS

Preheat the panini grill to medium-high heat (375°).

Assemble your panini, incorporating a generous amount of cheese to ensure there will be enough to hold the lollipop sticks in place.

Grill the panini for about 4 minutes until golden grill marks appear. Remove from the heat and immediately cut out shapes with cookie cutters (NOTE: If you’re using a metal cutter it will get HOT very quickly, so take care not to burn your fingers) and insert lollipop sticks.


Depending on the cheese you’re using you may need to wait a minute or two for the cheese to set the stick in place before serving. Enjoy!

Happy Cinco de mayo!!

Until Next Time...Happy Planning

May 4, 2011

Wine and Chocolate Pairing Party

If you want an amazing event that will blow your socks off and have actually made my clients cry, I am your girl. If you want a technical report on internet page impressions and blog activity reports then you want my best gal pal and coordinator who we will call "Techy." I was shocked when Techy informed me that we have over 1,500 readers a month visit this blog! Now that I know "You love me, you really love me" I will ATTEMPT to write more! I am a busy girl, wife and mom to Maddycakes so I promise you, my sweet readers, to let you behind my circus tent curtain to know what is going on here at Circle The Date Events, and what makes me say "WOW" when I am up at midnight researching trends for my beloved clients.

I have been to several "girl" parties here lately that have been fabulous and as I sit as a guest and planner I think to myself I wished I knew a planner that could plan a party for me. I found an amazing party that has pushed me to plan my own party and I am determined to enjoy it. I recently found master florist, Heavenly Blooms, and fell in LOVE with her work. This party is fabulous, who wouldn't love a chocolate and wine pairing party! I have many events that I am planning right now, so if you beat me to it please invite me, or atleast send me the pictures. OK enough talking check out this amazing eye candy;

I LOVE this beautiful rustic table. Fall is my favorite time of the year and this table makes me think of fall;


I love when a planner pays attention to the small details! That is exactly what they did with these Merlot smelling candles!


They used the french spelling of Chocolat! I am going to definately use the cranberries in the candle vase idea. That looks so pretty! They used Bakerella's red velvet cake ball recipe and said it was a huge hit!

I am pretty sure these wouldn't be approved by Nutrisystem!

Wine glasses were filled with fresh cranberries and remind me of a delicious sweet glass of red wine!


For the wine tags, they were inspired by the Hostess With The Mostess wine tag tutorial that you can see here. Heavenly Blooms writes, "We used textured cardstock and used a 1/8 circle hole punch to create perfect sized tags. We then used a tiny hole punch to pierce a whole for the twine. The tags were accented with a rhinestone for a little sparkle. This was a very easy project and guests loved it! They were able to write their names on the tags using a gold pen. The tags were easy to tie onto the stem of the glass as well." I love the use of the chalkboard! Genius!


They paired the following wines and chocolate together;


1. White Zinfandel and white chocolate

2. Almond Sparkling Wine and milk chocolate

3. Riesling and orange flavored dark chocolate

4. Pinot Noir and chocolate with almonds

5. Tawny Port and chocolate filled with caramel

6. Cabernet Sauvignon and espresso dark chocolate

I hope this party by Heavenly Blooms has inspired you to go plan your own chocolate and wine pairing party. Don't forget to invite me!! If you are planning an event and are in need of some inspiration and have a few hours on your hands, head over to the Heavenly Blooms blog and read through her posts, you will definately get some inspiration for your next event, which we would love to plan for you so you can stay where you belong...with your guests and stress free!

Until Next Time..Happy Planning!


.
Related Posts with Thumbnails